How to Install an RV Signal Booster: A Step-by-Step Guide
RV Signal Booster Installation—Stay Connected Anywhere
The first thing you notice when you drive out of the city in an RV is the fresh air, the open road, and the freedom to explore. The next thing you notice? Your cell signal disappearing.
There is a simple reason why this happens. Cities have plenty of cell towers to keep up with demand, but once you’re further out, those towers become few and far between. That means long stretches of weak or no service. If you spend a lot of time on the road, whether with friends, family, or on solo adventures, you’re probably all too familiar with this problem.
In this guide, we’ll show you how to install a cell phone signal booster in an RV. And if you don’t have one yet, you’ll definitely want one by the end. Installation takes less than an hour and is easy enough to do on your own; no tools or assistance required.
We fix poor cell phone signal! Find the right signal booster for you:


Step 1: Choosing the Right Cell Phone Booster for Your RV
There are plenty of cell signal boosters on the market, but not all are designed for recreational vehicles. RVs are larger than regular passenger vehicles and often carry more people, meaning they require a booster with enough power to cover the entire space. Some boosters work best while parked at a campsite, while others are designed to keep you connected even when you're on the move.
Before we dive headfirst into our RV cell phone signal booster installation guide, here are our best RV signal boosters for your next journey. If you already have one, skip to the next step.
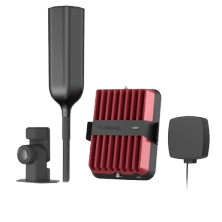
Our most powerful RV signal booster available, designed for both stationary and on-the-go use. With incredible cell tower reach and high-performing equipment, it significantly enhances 5G and 4G LTE even in remote locations. The 180° adjustable antenna mount allows flexible installation.
Shop Now: $549.99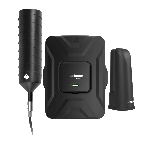
A solid multi-user RV signal booster option that improves cellular connectivity in both urban and rural areas. Ideal for those looking for reliable performance while camping or on the go.
Shop Now: $449.99
Designed exclusively for stationary use. Features a directional antenna to capture the strongest possible signal at campsites or remote locations. Perfect for extended camping or RV living.
Shop Now: $649.99Not sure which booster is right for you? Explore all our RV cell phone boosters or call us at 1-800-568-2723 for personalized recommendations. We’ll help you find the best fit for your setup.
Step 2: Mount the Outdoor Antenna
Setup will vary based on the type of outdoor antenna included in your kit. There are two main types of antennas: omnidirectional and directional. Each has a different mounting process.
Omnidirectional Antenna
If you have an omnidirectional antenna, you’ll want to mount it where it has the clearest path to catch signals from all directions. The best spot is usually on a ladder or pole at the rear of the RV. For the strongest performance, install it above the roofline and any other gear to minimize interference.
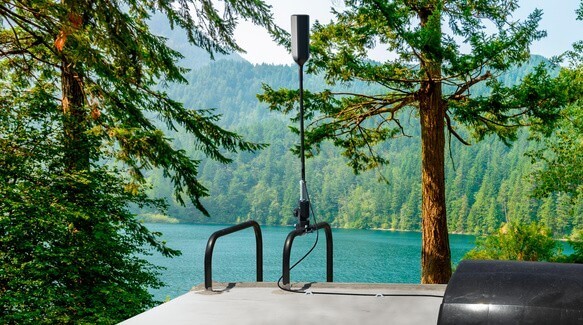
Keep in mind height restrictions while driving (typically 14 feet in western states and 13’6” in eastern states) so you don’t run into clearance issues. Once you’ve chosen a spot, assemble the mast to the correct height, thread the cable through, and secure it using the included mounting hardware.
Directional Antenna
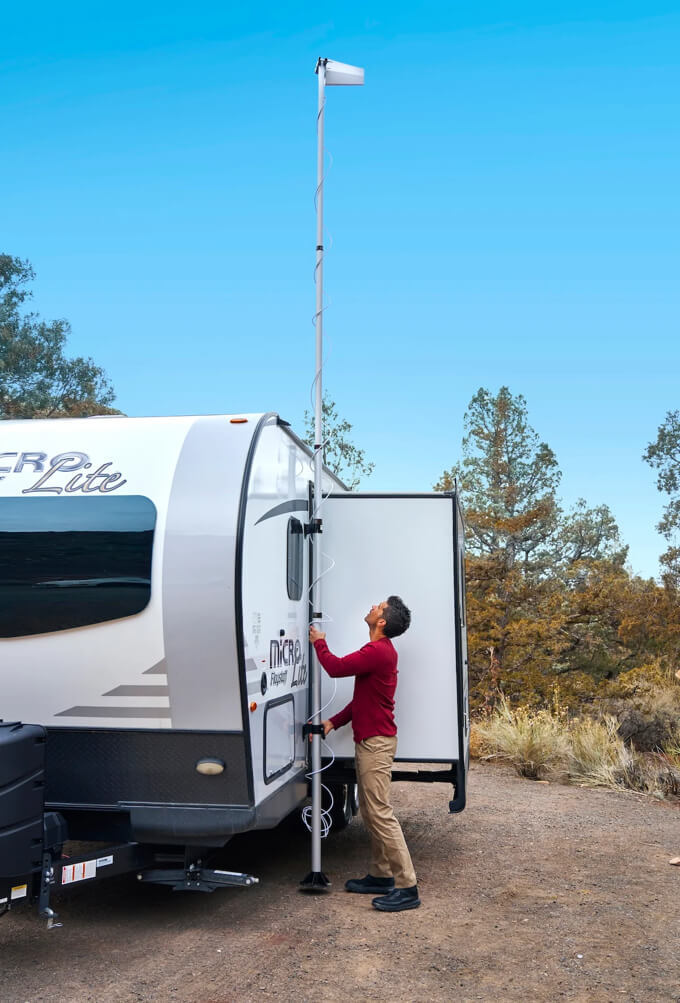
A directional antenna is only used with stationary boosters and needs to be aimed at the nearest cell tower for the best results. To set it up:
- Mount the antenna to the included telescoping pole using the provided brackets.
- Find a good mounting spot; near a slide-out or toy hauler ramp door on the side of your RV usually works best.
- Extend the pole and secure it to the RV with wall mounts.
- Rotate the pole to point the antenna toward your closest cell tower. Use the weBoost app or our dedicated cell tower locator tool to identify where to point the antenna.
Important safety notes:
- Keep the antenna and pole away from power lines or anything overhead.
- Never move your RV while the pole is up (with a directional antenna).
- Take the antenna down if winds exceed 35 mph or if there’s a storm in the area.
Step 3: Route the Antenna Cable into the RV
Once your antenna is mounted outside, it’s time to bring the coax cable inside. There are a few ways to do this, depending on your setup.
For Mobile RV Signal Boosters:
- Option 1: Use an existing entry point, like a junction box or cable gland. This is the easiest method if your RV already has an access point.
- Option 2: If your RV has a slide-out, you can route the cable through the rubber gasket and into the area where you’ll place the booster.
- Option 3: Drill a hole in the roof and seal it properly to prevent leaks. Before committing to this, try running the cable through a door or window temporarily and then finish setting up the system to make sure everything works before making any permanent changes.
For Stationary RV Signal Boosters:
The easiest way is to run the cable through the slide-out gasket or the back door of a toy hauler. Most kits include a flat entry cable to help with this.
Step 4: Find the Best Spot for the Amplifier
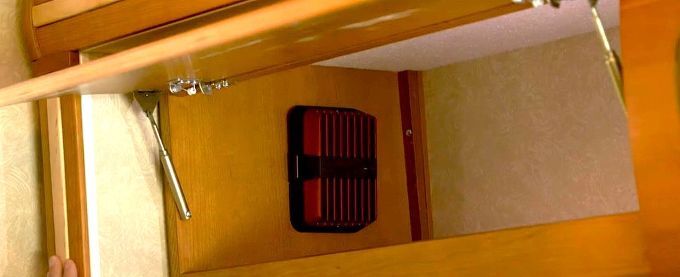
Your amplifier needs to be in a well-ventilated spot near a power source. A cabinet works great, as long as it allows enough airflow. Before securing it, check that both the inside antenna and outside antenna cables can reach it without strain.
Step 5: Set Up the Interior Antenna
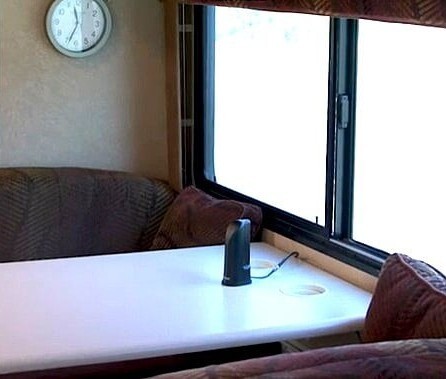
The placement of your inside antenna is key to getting the best results. It should be positioned in a spot where you need the strongest reception, with enough distance from the outdoor antenna to avoid interference. Here’s how to set it up based on the antenna type in your kit:
- Low-Profile Antenna (Included with the Drive Reach RV II): Compact and discreet, this antenna can be Velcro-mounted to the dashboard, seat, or interior wall for easy placement. Ideal for travelers who need a seamless setup with minimal space requirements.
- Desktop Antenna (Included with the Drive X RV): A freestanding option that works best on flat surfaces like tables or countertops. Best suited for RVs where passengers work or stream from a central indoor area.
- Panel Antenna (Included with the Destination RV): Designed for stationary setups, this antenna must be mounted to a wall and faced in the direction where signal improvement is needed. Its high-gain performance makes it ideal for long-term stays at campsites or remote locations.
Step 6: Connect Antenna Cables to the Amplifier
Now, connect the antenna cables to the amplifier. Make sure the connections are finger-tightened; no need to overdo it.
- The outside antenna cable goes to the port labeled "Outside Antenna" on the amplifier.
- The inside antenna cable connects to the port labeled "Inside Antenna."
Step 7: Power Up
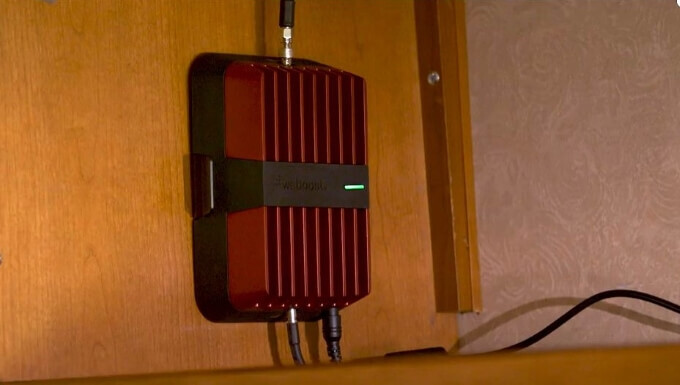
Plug in the power supply and connect it to an RV wall outlet. If you’re using a hardwired power supply, it’ll need to be connected directly to the RV’s power system.
Once powered on, your booster is ready to go! When the booster is working correctly, the indicator light should be green. If you want to check how much it’s improving your signal, you can test your signal strength before and after installation. If you see a red light or a blinking green/red light, it means there’s possible oscillation (interference between antennas). To fix this, try increasing the distance between your inside and outside antennas.
Stay Connected No Matter Where the Road Takes You
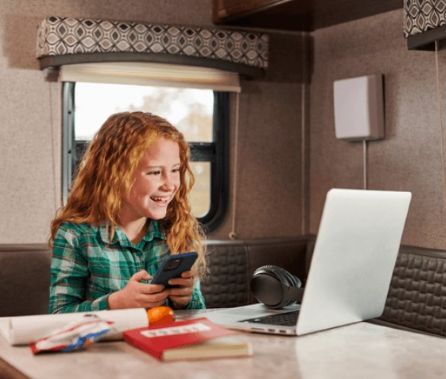
Getting a signal booster for your RV means fewer dropped calls, stronger data connections, and reliable service whether you’re driving through remote highways or setting up camp in the mountains. With the right setup, you can work, stream, and stay in touch from virtually anywhere—and your travel companions will thank you for it.
We hope these RV signal booster installation tips helped make the setup process easy and hassle-free. If you're still deciding which booster fits your needs, explore our full RV booster collection.
Have any questions or need help choosing the right booster for your vehicle? Give us a call at 1-800-568-2723.
No matter where your next journey takes you, a strong signal will always be within reach.
Interested in Learning More? Check Out Our Signal Boosting Info Center


Money Back Guarantee

Technical Support